Citrix Logon Best Practices and Troubleshooting


This just came out and thought it was timely for some things I'm working on.
Best part was Troubleshooting Tools section on page 12 that covered the Edgesight Session Startup Duration Detail report/breakdown of the logon process.  This report would also be a good validation tool with each vDisk rev, Profile or GPO changes. All the acronyms below correspond to different steps in the login process so you can pin point the area that is slow (i.e. web interface, login script, etc). This is handy paper to keep around in case you need it.

Edgesight Server Startup Details

Citrix Success Accelerator for XenDesktop

If you haven't seen Citrix's new Success Accelerator for XenDesktop, you should check it out before doing any size deployment (i.e. 10 to 1000s).  I wish we had this 12 months ago when we started our pilot.  It is in a Q&A format and gets you thinking about all the technologies involved and what choices you may need to make. It will walk you through the Design, Implementation and Rollout phases and provide an output of instructions and resources for your project.  Definitely check it out.

Screenshot of the web ui is below.


Pink screen after Xenith Firmware 1.7 upgrade

I ran into this after upgrading our Wsye Xenith from 1.6 to 1.7 firmware. We were using the AutoSignoff=yes Shutdown=yes commands in our ini and after users devices were powered down then up again were seeing this.  Ironically, it didn't occur on the Xenith Pro's.


To reproduce:
1. Apply firmware 1.6
2. Upgrade to 1.7
3. Shutdown from Wyse Toolbar
4. Power on and the issue occurs

To resolve:
1. While shutdown, pull power supply
2. Start up.

OR add this to your xen.ini or wnos.ini
AutoSignoff=yes Shutdown=yes
ShutDown=turnoff 

This appears to be a known issue with no good documented solution so hopefully this helps.


DPM 2010 and Juniper SRX Firewall

SharePoint 2010 is all the rage (still) and products are finally maturing enough where you don't need best of breed to get everything done. We recent started rolling Microsoft's Data Protection Manager (DPM) 2010 to do our SharePoint 2010 back ups. DPM 2007 recovery process through a "recovery farm" is a thing of the past with DPM 2010 so the timing was right. So we choose DPM 2010 as our backup/recovery strategy and implemented it fine on the intranet but then....yes we need SharePoint 2010 on the extranet so DPM 2010 followed and so did the firewall....

I followed the ports outlined by Microsoft and cringed a little with the 135 TCP Dynamic reference and the somewhat legal jargen below it. Anyone who has worked with Microsoft and sees DCOM, RPC or the phrase "port range" knows what I mean when I say cringe. I found this article recently by Thomas Shinder and while a little older the diagrams illustrate network traffics behavior for RPC traffic. Since all our servers are Windows Server 2008, the high port range is ONLY the TCP 49152 – 65535. Yes only 16,000 ports which makes my security team cringe as well.

Our environment:
- All Windows Server 2008 or 2008 R2 64bit
- DPM 2010
- SharePoint 2010
- Juniper SRX Firewall

So assuming you have proper communication to your Domain Controller from your windows servers, what are the options:
 

1. Open 135 TCP Dynamic, 3148/3149 TCP, and open the port range if not respected by the firewall as dynamic
 Pros: Easy...just open the ports
 Cons: Lots of ports open


2. Create an IPsec tunnel between DPM and the Protected Servers (see this for more info)
 Pros: Open only a few ports
 Cons: Need to maintain IPsec policy via local or group policy on all DPM and Protected Servers


3. Change the RPC port range
 Pros: Easy to change via registry
 Cons: It affects ALL RPC traffic not just DPM's PLUS need to maintain on all DPM and Protected Servers


4. Open 3148/3149 TCP and leverage MSDPM UUIDs
 Pros: Set it and forget it
 Cons: Hard to find the UUID without looking through traces or googling a lot.


So we when with number #4. We dealt with Active Directory communciation through our Juniper firewalls a few years ago and remembered the UUID model. So I started searching and came across Steve Buchanan write-up and while for ISA, Juniper has the same functionality. Long story short, we implemented a Global UUID Services with the following on our Juniper SRX Firewall:

MSDPM AC:
{C4EBD674-1457-4B79-BE30-B04735AED9D1}
{A3B9D3F4-2477-4F95-B2D1-F75B0FDF2A2F}


DPM RA:{DA6AA17A-D61C-4E9C-8CEA-DB25DEA52A95}
{2DF31D97-33CC-4966-8FF9-F47C90F7D0F3}


MSDPM:
{27F60283-447F-4D5F-AA84-F45D09BD06EF}
{8D8C691A-AFE6-4EA3-A6B2-F3E5EF1BD0CA}


DPM LA:{1B308A4A-FFEC-4C85-957C-53AA1DCC696F}
{9E6C5356-B180-4295-888C-5A99E505420F}


RPC interface UUID for IRemoteSCMActivator
{000001A0-0000-0000-C000-000000000046}


RPC interface UUID for IObjectExporter
{99fcfec4-5260-101b-bbcb-00aa0021347a}


RPC SMB Relay type bind
{6cb71c2c-9812-4540-0300-000000000000}

Microsoft NDR Transfer Syntax Identifier
{8a885d04-1ceb-11c9-9fe8-08002b104860}

The last four I'm thinking are covered under ISA's default 135 TCP Dynamic configuration so they were additional on the SRX.

** Some of the errors you'll see if firewall is blocking traffic to the protected servers (when you are "attaching" an agent).  Just run a trace on the DPM server using Wireshark or Netmon and look for ReSynTransmits over the TCP 49152 – 65535 range.

Install protection agent on SERVERA.lmx.abc.com failed: Error 346: DPM is unable to retrieve the configuration information from SERVERA.abc.com. Recommended action: Ensure that the Windows Management Instrumentation (WMI) service is started. If the firewall is turned on, on SERVERA.abc.com make sure that an exception for WMI is created.

The RPC server is unavailable (0x800706BA)

Good luck..and chances are it is the firewall! 

XenDesktop ESXi Permissions

Background:
Jarian Gibson has a great post here on all the VMware ESX permissions needed for XenDesktop Desktop Delivery Controller (DDC) to communciate with the VMware ESXi VirtualCenter.  I ran into one issue below, using the Citrix Provisioning Services XenDesktop Wizard and had to add "Virtual Machine > Configuration > Change CPU count which is the attribute "VirtualMachine.Config.CPUCount".


Environment:
Citrix XenDesktop 5 SP1
Citrix Provisioning Services 5.6 SP1
VMware ESXi 4.1 Update 1


Problem:
Error There was an error reported by the wizard
[VDI-NonProd-XXXX] Failed to connect with the requested server. (Permission to perform this operation was denied. (NoPermissionFault)(group-v51VirtualMachine.Config.CPUCount) )


Solution:
I was getting the error above but after adding the Change CPU count option it was fixed.  Detailed permissions are outlined below.


ESXi 4.x Perms
At the Datastore node
-   Allocate space
-  Browse Data Store
- Low level file operations
On the Global Node
-  Manage custom attributes
- Set custom attributes
On the Network node
- Assign network
On the Resource node
- Assign virtual machine to resource pool
On the Task node
- Create Task

On the Virtual Machine > Configuration node
- Add existing disk

- Add new disk
- Change resource
- Remove disk


On the Virtual Machine > Interaction node
- Power On

- Power Off
- Power Suspend
- Power Reset
On the Virtual machine > Inventory node
- Create from existing
- Create new
- Register
- Remove
On the Virtual machine > Provisioning node
- Allow disk access
- Allow virtual machine download
- Allow virtual machine files upload
- Clone template
-  Clone virtual machine
- Deploy template
On the Virtual machine > State node
- Revert to snapshot

Citrix PVS: domain/user does not have access to farm

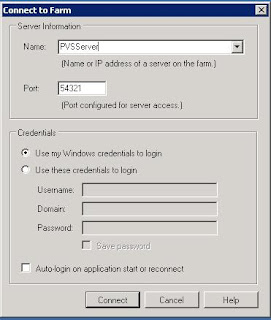
Background:  I saw a bunch a folks having issues accessing the Citrix Provisioning Services (PVS) console after installing it and then uninstalling, reinstalling, changing service accounts etc to get access.  See this forum.  I think the problem is simply setting up the security groups in PVS.

Problem/Errors: When trying to access the PVS console get the following error(s):

"The domain/user does not have access to the farm:


"An error occured communicating with the server."


Solution: You need to add the security groups in the PVS console

1. On PVS server, launch PVS console
-  Enter "localhost"
- Select "Use these credentials to login" and enter the account used to install PVS
- Click Connect

2. Right click on the Farm
- Select Properties > Groups tab.
- Type the AD group name and select Search (tends to hang so be patience; if it throws a Snap-in error select "Cancel")
 - Check off the white box to left of the group
- Click Ok
- Go to Security Tab
- Click Add
- Check off the white box to left of the group
- Click Ok
- Click Ok
3. Close PVS Console
4. Relaunch PVS Console
- Specify Name (ie localhost, ip, DNS, or FQDN as all should work)
- Select "Use my Windows credentials to login
 Also, once into the console you can manage your connections by right clicking on "Provisioning Services Console" and selecting "Manage Connections".

XenDesktop 5 and Database Mirroring

Background:
We setup our two XenDekstop 5 Desktop Delivery Controllers (DDC) and then configured our new DDC SQL database to be mirrored.  As result, you must update the DDC's database connection.

A side note, you don't need to do this for Provisioning Services (PVS) since you can specific the failover mirror in the install wizard.  As result, just follow the PVS db setup best practices and the mirror ahead of time and your are all set. 

Additional Info:


Change XD5 Database Connection
http://support.citrix.com/article/CTX127538


DB Mirroring Best Practices
http://support.citrix.com/servlet/KbServlet/download/25938-102-649422/XD_Database_Mirroring_Best_Practices.pdf


PowerShell SDK Download
http://www.microsoft.com/downloads/details.aspx?displaylang=en&FamilyID=50633a1f-a665-425d-923c-1a269f8ac084
 
Our solution:
  1. Run Windows Powershell Module
  2. Run set executionpolicy unrestricted
  3. Run get-BrokerDBConnection (to see current connection)
  4. Run the following powershell cmdlet (Just replace the server names and database name in bold).
$MirroredConnectionString =
'Server=SQLServerA.test.com;Initial Catalog = CTX_XDDDC_5x; Integrated Security = True;
Failover Partner=SQLServerB.com'


$brokers = Get-BrokerController
foreach ($broker in $brokers)
{
$brokerDNSName = $broker.DNSName
Set-ConfigDBConnection –DBConnection $null –adminaddress $brokerDNSName
Set-ConfigDBConnection –DBConnection $MirroredConnectionString –adminaddress $brokerDNSName
Set-AcctDBConnection –DBConnection $null –adminaddress $brokerDNSName
Set-AcctDBConnection –DBConnection $MirroredConnectionString –adminaddress $brokerDNSName
Set-BrokerDBConnection –DBConnection $null –adminaddress $brokerDNSName
Set-BrokerDBConnection –DBConnection $MirroredConnectionString –adminaddress $brokerDNSName
Set-HypDBConnection –DBConnection $null –adminaddress $brokerDNSName
Set-HypDBConnection –DBConnection $MirroredConnectionString –adminaddress $brokerDNSName
Set-PvsVmDBConnection –DBConnection $null –adminaddress $brokerDNSName
Set-PvsVmDBConnection –DBConnection $MirroredConnectionString –adminaddress $brokerDNSName
Set-ProvDBConnection –DBConnection $null –adminaddress $brokerDNSName
Set-ProvDBConnection –DBConnection $MirroredConnectionString –adminaddress $brokerDNSName
}


You only need to run this on one DDC.  To confirm that that the change took place.  Run get-BrokerDBConnection to see the update connection.